
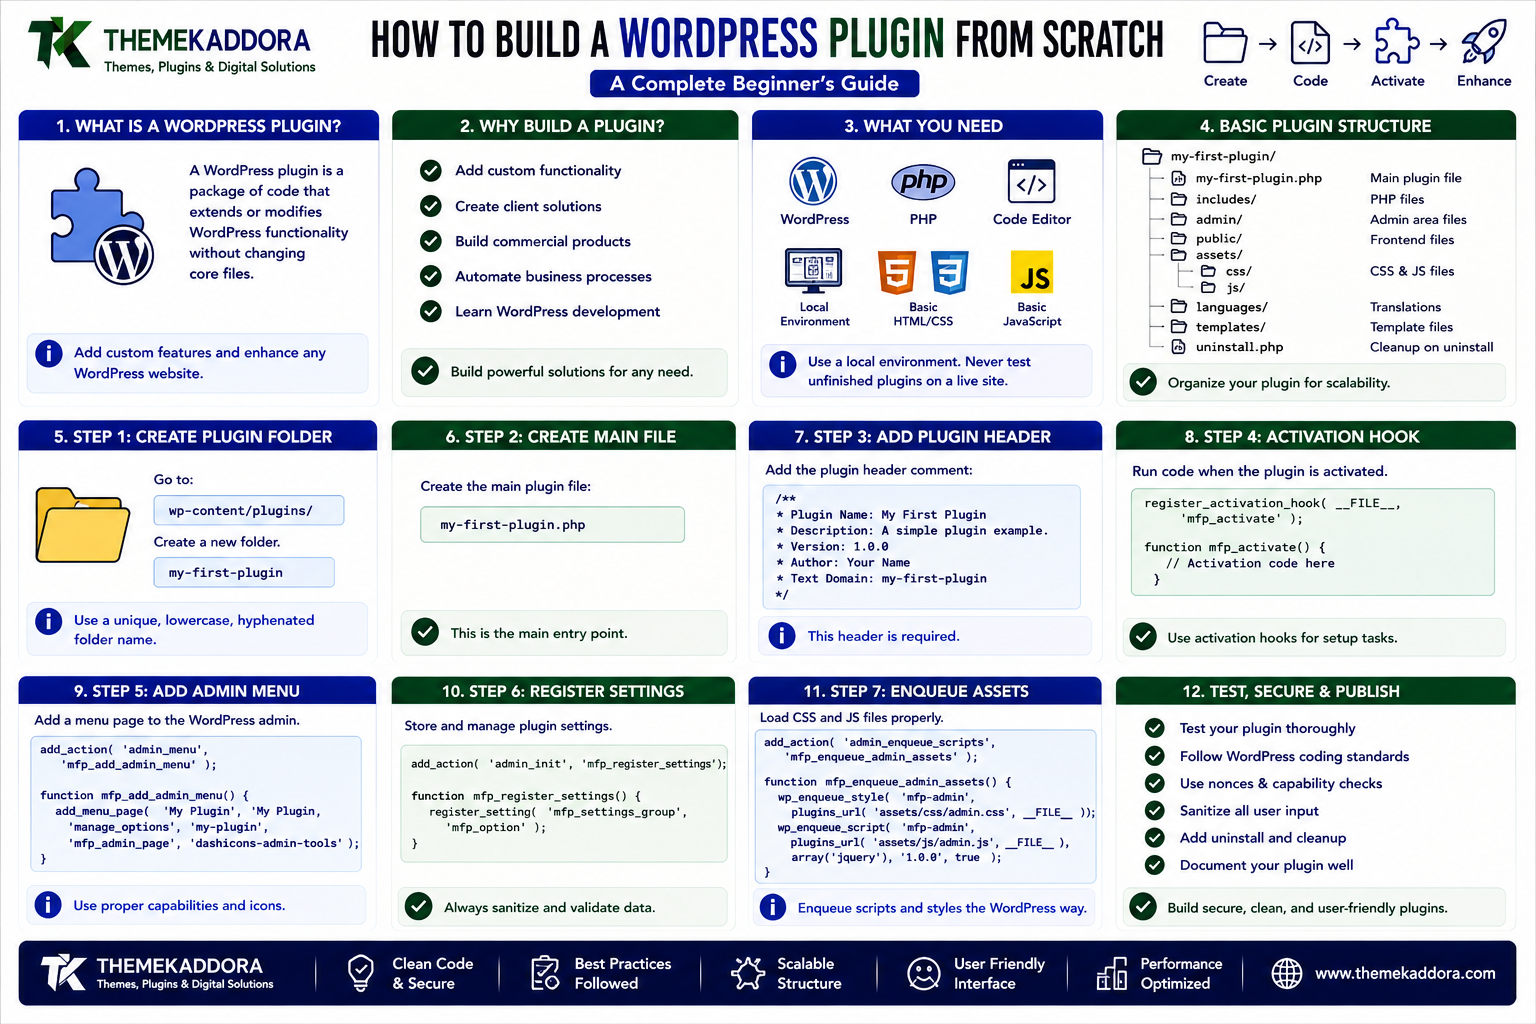
How to Build a WordPress Plugin From Scratch: Complete Beginner's Guide
Introduction
One of the biggest advantages of WordPress is its extensibility.
Instead of modifying WordPress core whenever you need additional functionality, you can create a plugin that adds features while keeping the core system untouched.
Plugins can add almost anything to a WordPress website, including:
Custom forms
Analytics
SEO features
Ecommerce functionality
Membership systems
Admin tools
API integrations
Automation
AI features
Custom content management
Business workflows
For developers, learning how to build WordPress plugins opens the door to creating custom solutions for clients, businesses, marketplaces, SaaS products, and WordPress users.
The good news is that a basic WordPress plugin can start with just a single PHP file.
However, building a professional plugin requires much more than writing a few lines of code.
You need to understand:
Plugin structure
WordPress hooks
Security
Permissions
Settings
Database interactions
Internationalization
Asset management
Error handling
Compatibility
Testing
In this guide, you'll learn how to create a WordPress plugin from scratch and gradually turn a simple plugin into a maintainable WordPress project.
What Is a WordPress Plugin?
A WordPress plugin is a package of code that extends or modifies WordPress functionality.
Plugins can add new features without changing WordPress core files.
For example, a plugin could add:
A contact form
or:
A custom dashboard
or:
An AI assistant
or:
WooCommerce analytics
or:
A custom business workflow
The plugin system allows WordPress to be extended without modifying the underlying core application.
Why Build a WordPress Plugin?
There are several reasons to build a custom plugin.
Add Custom Functionality
A website may require functionality that isn't available in existing plugins.
Create Client Solutions
Developers and agencies can create custom plugins for specific business requirements.
Build Commercial Products
Plugins can be distributed through:
WordPress.org
Commercial marketplaces
Developer websites
SaaS platforms
Automate Business Processes
Plugins can connect WordPress with external systems and automate repetitive tasks.
Learn WordPress Development
Plugin development is one of the best ways to understand how WordPress works internally.
What Do You Need to Build a WordPress Plugin?
You don't need an advanced development environment to create a basic plugin.
You'll generally need:
WordPress
PHP
A code editor
A local development environment
Basic HTML/CSS knowledge
Basic JavaScript knowledge for advanced interfaces
A local WordPress installation is strongly recommended while learning.
Never experiment with unfinished plugin code on a production website.
Understanding the Basic Plugin Structure
A simple plugin can start with one PHP file.
For example:
my-first-plugin/ └── my-first-plugin.php
The folder contains the plugin's main PHP file.
As the plugin becomes more complex, you can organize it into multiple directories.
A professional plugin might look like:
my-first-plugin/ ├── my-first-plugin.php ├── includes/ ├── admin/ ├── public/ ├── assets/ │ ├── css/ │ └── js/ ├── languages/ ├── templates/ └── uninstall.php
The exact structure depends on the plugin's requirements.
Step 1: Create the Plugin Folder
Inside your WordPress installation, navigate to:
wp-content/plugins/
Create a new folder.
For example:
my-first-plugin
Plugin folder names should be unique and should avoid spaces.
A project-specific prefix can help reduce naming conflicts.
Step 2: Create the Main Plugin File
Inside the folder, create:
my-first-plugin.php
This becomes the primary plugin file.
The file should contain a WordPress plugin header.
For example:
<?php /** * Plugin Name: My First Plugin * Description: A simple WordPress plugin created for learning purposes. * Version: 1.0.0 * Author: Your Name * Text Domain: my-first-plugin */
WordPress reads this information to identify the plugin.
Step 3: Add a Plugin Entry Point
A simple plugin can begin with:
<?php if ( ! defined( 'ABSPATH' ) ) { exit; }
This prevents direct access to the plugin file.
The ABSPATH constant is defined by WordPress when the application is loaded.
If the PHP file is accessed directly outside WordPress, the execution stops.
Step 4: Add Your First WordPress Hook
WordPress provides hooks that allow plugins to interact with the platform.
One important type is an action hook.
For example:
add_action( 'init', 'my_first_plugin_init' ); function my_first_plugin_init() { // Plugin initialization logic. }
This tells WordPress to execute your function when the init action occurs.
Hooks are fundamental to WordPress plugin development.
You'll learn much more about them in the next article in this series.
What Are WordPress Hooks?
Hooks allow developers to interact with WordPress without modifying core files.
There are two major types:
Actions
Actions allow you to execute code at specific points.
Examples include:
Initializing functionality
Loading admin pages
Registering post types
Loading scripts
Filters
Filters allow you to modify data before WordPress uses or displays it.
For example, a filter could modify:
Content
Titles
Excerpts
Output
Configuration values
Understanding hooks is essential for plugin development.
Step 5: Add a Simple Feature
Let's create a basic feature that adds a message to the WordPress footer.
For example:
add_action( 'wp_footer', 'my_first_plugin_footer_message' ); function my_first_plugin_footer_message() { echo '<p>Powered by my custom WordPress plugin.</p>'; }
Once activated, the plugin adds the message to the frontend footer.
This simple example demonstrates the core WordPress plugin concept:
Plugin
↓
Hook
↓
Function
↓
Output
Step 6: Create an Admin Page
Most useful plugins eventually need an administration interface.
WordPress allows plugins to create custom admin menu pages.
A basic example:
add_action( 'admin_menu', 'my_first_plugin_admin_menu' ); function my_first_plugin_admin_menu() { add_menu_page( 'My First Plugin', 'My First Plugin', 'manage_options', 'my-first-plugin', 'my_first_plugin_admin_page' ); } function my_first_plugin_admin_page() { echo '<div class="wrap">'; echo '<h1>My First Plugin</h1>'; echo '<p>Welcome to your plugin settings.</p>'; echo '</div>'; }
This creates a new administration page for users with the required capability.
Step 7: Use Capability Checks
Never assume every logged-in user should have access to your plugin's administration features.
For example:
current_user_can( 'manage_options' )
can be used to check whether the current user has the required capability.
Capabilities help control who can:
View settings
Modify configuration
Manage data
Perform administrative actions
Always choose the least powerful capability that satisfies the requirement.
Step 8: Secure Form Submissions
If your plugin includes forms, security becomes extremely important.
A secure WordPress form should consider:
Nonces
Capability checks
Input validation
Sanitization
Output escaping
For example, a nonce can help verify that a request originated from an authorized WordPress interface.
A typical form might include:
wp_nonce_field( 'my_first_plugin_save_settings', 'my_first_plugin_nonce' );
When processing the request, verify the nonce before continuing.
Step 9: Sanitize Input
Never blindly trust user input.
For example, when receiving a text value:
$value = isset( $_POST['value'] ) ? sanitize_text_field( wp_unslash( $_POST['value'] ) ) : '';
The exact sanitization function should match the type of data being accepted.
Different data types require different approaches.
Step 10: Escape Output
Sanitizing input isn't a replacement for escaping output.
When displaying data, escape it according to the output context.
For example:
echo esc_html( $value );
For HTML attributes:
echo esc_attr( $value );
For URLs:
echo esc_url( $url );
A secure plugin considers both input handling and output handling.
Step 11: Store Plugin Settings
Plugins often need configuration options.
Examples include:
API keys
Feature toggles
Display preferences
Default values
Integration settings
WordPress provides APIs for storing options.
A simple option can be saved using:
update_option( 'my_first_plugin_settings', $settings );
And retrieved using:
$settings = get_option( 'my_first_plugin_settings', array() );
For professional settings pages, use WordPress's Settings API rather than manually handling every configuration mechanism.
Step 12: Load CSS and JavaScript Properly
Don't place large CSS or JavaScript blocks directly inside plugin PHP files.
WordPress provides enqueue functions.
For example:
add_action( 'admin_enqueue_scripts', 'my_first_plugin_admin_assets' ); function my_first_plugin_admin_assets() { wp_enqueue_style( 'my-first-plugin-admin', plugin_dir_url( __FILE__ ) . 'assets/css/admin.css', array(), '1.0.0' ); }
This allows WordPress to manage dependencies and loading more effectively.
Step 13: Organize Plugin Code
As your plugin grows, avoid putting everything into one PHP file.
Separate responsibilities.
For example:
includes/
can contain shared functionality.
admin/
can contain administration functionality.
public/
can contain frontend functionality.
assets/
can contain CSS and JavaScript.
This makes the codebase easier to understand and maintain.
Step 14: Use a Unique Prefix
WordPress websites can contain many plugins.
Your functions, classes, constants, options, and hooks should avoid generic names.
Instead of:
function save_data() {}
use a unique prefix:
function kaddora_save_data() {}
For larger projects, namespaces can provide additional organization.
A unique naming strategy reduces potential conflicts with other plugins and themes.
Step 15: Add Internationalization
If you plan to distribute a plugin publicly, make its text translatable.
Instead of:
echo 'Settings Saved';
use WordPress internationalization functions.
For example:
echo esc_html__( 'Settings Saved', 'my-first-plugin' );
This allows translators to provide localized versions of your plugin's text.
Internationalization should be considered from the beginning rather than added after the plugin is complete.
Step 16: Handle Plugin Activation
Some plugins need to perform setup tasks when activated.
For example:
Create database tables
Set default options
Register initial configuration
WordPress provides activation hooks.
Example:
register_activation_hook( __FILE__, 'my_first_plugin_activate' ); function my_first_plugin_activate() { // Activation tasks. }
Only perform necessary setup during activation.
Avoid expensive or unnecessary operations.
Step 17: Handle Plugin Deactivation
Some temporary functionality may need to be cleaned up when a plugin is deactivated.
For example:
register_deactivation_hook( __FILE__, 'my_first_plugin_deactivate' ); function my_first_plugin_deactivate() { // Temporary cleanup. }
Be careful about deleting user data during deactivation.
Deactivation does not necessarily mean the user wants all plugin data permanently removed.
If permanent deletion is required, provide a deliberate uninstall process instead.
Step 18: Create an Uninstall Process
If your plugin stores data, consider how that data should be removed when the plugin is permanently uninstalled.
A plugin can use:
uninstall.php
for uninstall-specific cleanup.
The uninstall process should be intentional and documented.
Never unexpectedly delete important user data.
Step 19: Test Your Plugin
Before releasing a plugin, test it thoroughly.
Test:
Activation
Deactivation
Uninstallation
Admin pages
Forms
Permissions
Frontend functionality
Mobile layouts
JavaScript
CSS
Database operations
Error conditions
Also test with different WordPress configurations.
Test With Other Plugins
Plugin conflicts are common in the WordPress ecosystem.
Test your plugin alongside commonly used plugins where practical.
Look for:
PHP errors
JavaScript conflicts
CSS conflicts
Duplicate functionality
Database issues
Admin interface problems
Use unique names and WordPress APIs to reduce compatibility problems.
Test Different User Roles
A plugin may behave differently depending on user capabilities.
Test appropriate roles such as:
Administrator
Editor
Author
Contributor
Subscriber
The exact roles you need to test depend on your plugin.
Verify that users can only perform actions they are authorized to perform.
Debugging a WordPress Plugin
WordPress provides debugging features that can help developers identify problems.
During development, developers commonly use:
WP_DEBUG
and related debugging settings.
Debugging can reveal:
PHP warnings
Notices
Deprecated functionality
Fatal errors
Incorrect code behavior
Avoid exposing debugging information publicly on production websites.
Common WordPress Plugin Development Mistakes
Modifying WordPress Core
Never modify WordPress core files to add plugin functionality.
Using Generic Function Names
Generic names can conflict with other plugins.
Trusting User Input
Always validate and sanitize appropriate input.
Forgetting Output Escaping
Data should be escaped according to its output context.
Skipping Permission Checks
Users should only access functionality they are authorized to use.
Loading Assets Everywhere
Only load plugin assets on the pages where they are needed.
Hardcoding URLs
Use WordPress functions for URLs and paths.
Creating Database Tables Without a Real Need
Use existing WordPress data structures when they are sufficient.
Deleting Data During Deactivation
Deactivation and uninstall are different lifecycle events.
Ignoring Internationalization
Public plugins should be designed with translation in mind.
WordPress Plugin Development Best Practices
A professional plugin should:
Follow WordPress coding standards.
Use hooks instead of modifying core.
Sanitize input.
Validate data.
Escape output.
Use nonces for appropriate requests.
Check user capabilities.
Use WordPress APIs.
Enqueue assets correctly.
Use unique prefixes or namespaces.
Support internationalization.
Handle errors gracefully.
Document important functionality.
Test compatibility.
Avoid unnecessary database operations.
These practices make plugins safer, easier to maintain, and easier to distribute.
Free Plugin vs Commercial Plugin Development
The development principles remain similar whether you're building a free or commercial plugin.
However, commercial plugins often require additional considerations such as:
Licensing
Updates
Support
Documentation
Payment integration
Premium features
Telemetry policies
Compatibility guarantees
A professional product requires more than functional code.
It also requires a maintainable user experience.
WordPress.org Plugin Development Considerations
If you plan to distribute your plugin through the WordPress.org plugin directory, review the current directory requirements before submission.
Pay particular attention to:
Plugin headers
Licensing
Security
External services
User privacy
Internationalization
Code quality
Admin behavior
Trademark considerations
Readme requirements
Requirements can evolve, so developers should always verify the current official guidelines before submitting.
Building a Professional Plugin Architecture
A simple plugin may begin as:
plugin.php
But a larger plugin might eventually become:
plugin-name/ ├── plugin-name.php ├── includes/ │ ├── class-plugin.php │ ├── class-settings.php │ └── class-database.php ├── admin/ │ ├── class-admin.php │ └── views/ ├── public/ │ ├── class-public.php │ └── views/ ├── assets/ │ ├── css/ │ └── js/ ├── languages/ ├── templates/ ├── uninstall.php └── readme.txt
The exact structure should match the complexity of the plugin.
Don't create dozens of files simply to make a small plugin appear professional.
Architecture should solve real maintenance problems.
From Simple Plugin to Commercial Product
A useful development progression is:
Stage 1
Create a basic plugin.
Stage 2
Add hooks and functionality.
Stage 3
Add settings.
Stage 4
Add security.
Stage 5
Separate admin and frontend code.
Stage 6
Add internationalization.
Stage 7
Add testing and documentation.
Stage 8
Optimize compatibility and performance.
Stage 9
Prepare distribution and updates.
This approach helps prevent unnecessary complexity during early development.
Why choose ThemeKaddora?
ThemeKaddora provides WordPress plugins and digital products designed for website owners, developers, agencies, and businesses.
Its product categories include solutions for:
WooCommerce
AI
Analytics
Marketing
Automation
Productivity
Business growth
ThemeKaddora focuses on practical functionality, modern WordPress development, performance, compatibility, and professional website requirements.
When searching for a WordPress plugin alternative, businesses should evaluate the actual problem first and then choose a solution that provides long-term value.
Final Thoughts
Building a WordPress plugin can begin with just one PHP file, but creating a professional WordPress plugin requires careful architecture and development practices.
The most important principles are straightforward:
Don't modify WordPress core.
Use hooks.
Secure user input.
Check permissions.
Escape output.
Use WordPress APIs.
Keep code organized.
Test thoroughly.
Plan for compatibility and maintenance.
Once you understand these fundamentals, you can move from simple plugins to sophisticated products that add powerful functionality to WordPress.
Plugin development is not just about making code work.
It's about building functionality that works safely, consistently, and predictably inside a much larger WordPress ecosystem.
Frequently Asked Questions
What is a WordPress plugin?
A WordPress plugin is a package of code that extends WordPress with additional functionality without requiring modifications to WordPress core.
Can beginners create WordPress plugins?
Yes. Beginners can start with simple plugins and gradually learn hooks, APIs, security, settings, database operations, and architecture.
What programming language is used for WordPress plugins?
PHP is the primary programming language for WordPress plugins. HTML, CSS, and JavaScript are also commonly used for interfaces and frontend functionality.
Where are WordPress plugins stored?
Plugins are normally stored inside the WordPress wp-content/plugins/ directory.
Can I create a WordPress plugin with one PHP file?
Yes. A simple plugin can consist of a single PHP file. Larger plugins generally benefit from a structured architecture.
Are WordPress plugins safe?
Plugins can be safe when they are developed, reviewed, maintained, and updated properly. Poorly written plugins can introduce security and compatibility problems.
Should a plugin modify WordPress core files?
No. Plugin functionality should use WordPress APIs and hooks rather than modifying core files.
How do I secure a WordPress plugin?
Use appropriate capability checks, nonces, validation, sanitization, escaping, secure database operations, and careful permission handling.
Should plugin data be deleted when the plugin is deactivated?
Not automatically. Deactivation and uninstall are different lifecycle events, and users may deactivate a plugin without wanting its data removed.
Can I sell a WordPress plugin?
Yes. WordPress plugins can be distributed through marketplaces, commercial websites, subscription systems, or other appropriate channels.
How do I prepare a plugin for WordPress.org?
Review the current WordPress.org plugin requirements, including security, licensing, external services, internationalization, documentation, and code-quality expectations before submission.
Why choose Themekaddora?
Themekaddora provides lightweight, responsive, SEO-friendly WordPress themes with fast performance, WooCommerce compatibility, flexible customization, accessibility-conscious design, modern templates, regular updates, and professional support—providing a strong foundation for businesses building digital products and product-focused websites.
Comments (0)